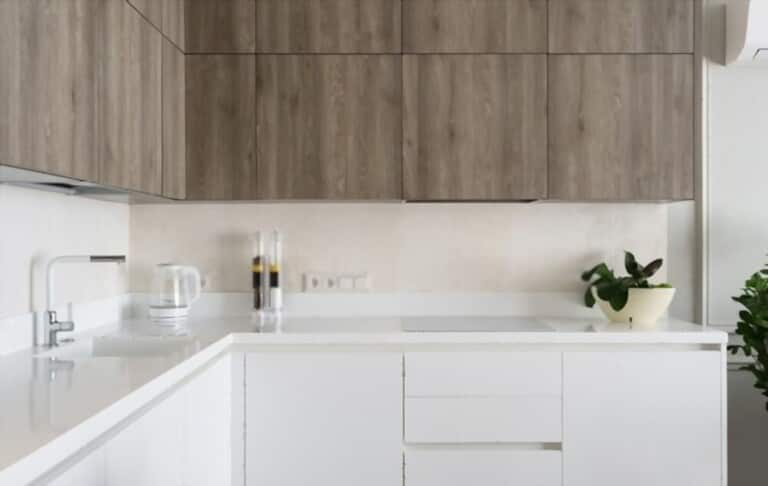
The power fiend in your kitchen. Just consider all the kitchen-related electrical items you use and how each one needs an outlet to receive power. You must adhere to electrical rules for outlet kinds and locations in order to make sure your kitchen is secure. You can conceal certain outlets from view in your kitchen by placing them in and around cupboards, but not all of them can be concealed in this way.
Outlets must be positioned along the counters of kitchens at regular intervals. The outlets must be spaced every 12 feet across a wall or every 4 inches along this counter. This distance rule does not apply to outlets installed inside kitchen cupboards or behind a drop-down equipment garage. In this article, you will find how to install under cabinet outlets for your kitchen.
What are Under Cabinet Outlets?
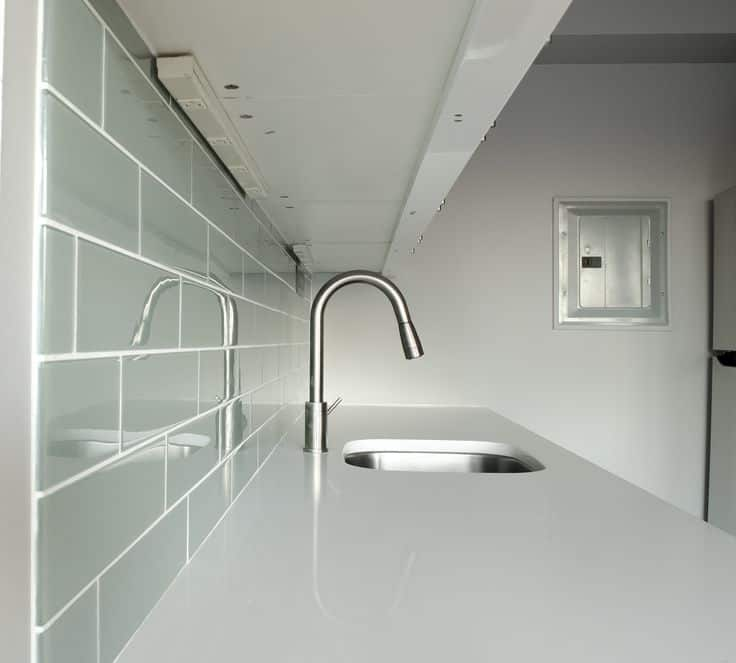
Instead of putting outlets in awkward locations, such as behind machines or in front of counters, where they are frequently bumped into and broken, an under-cabinet plug mold is an option. It was made specifically for cupboards so that people standing close to kitchen countertops could easily access plugs. In the kitchen with open outlets or moist areas where electrical wires may be at risk of getting wet, it also offers covert protection from water damage.
The under-cabinet outlets can be installed in bathrooms as well as kitchens. Water cannot enter the plug socket, though, so that is the only potential danger. Roof outlet strips might be best for this use. Because it is hidden, it is also the ideal answer for nightstands, office desks, garages, and other places where you don't want plugs to be lying around.
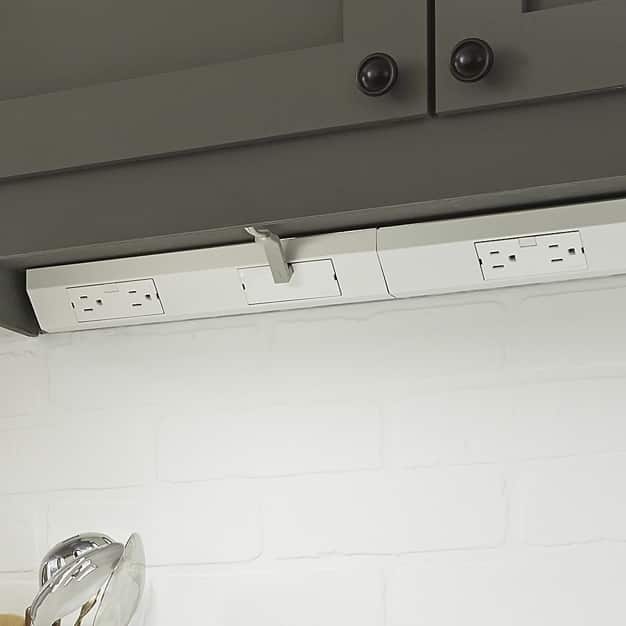
While certain electrical rules provide for a 6- to 12-foot distance between wall outlets, outlets positioned above kitchen counters must have a considerably smaller 4-foot gap. Additionally, according to these same standards, every outlet above the countertop needs to be separated into at least two independent circuits. This prevents an outlet-covering circuit from overloading and triggering the circuit breaker. A useful rule of thumb to follow when placing outlets is that a small kitchen appliance's power wire should be able to extend to the nearest outlet from any location on the countertop.
How to install under cabinet outlets
Install outlets slightly beneath the "apron" of elevated kitchen cabinets to hide outlets along counters while keeping them accessible. The hardwood piece that encircles a cabinet's base and leaves a shallow space inside is called an apron. These locations can be equipped with power outlets or under-cabinet lighting. Here, we walk you through the process of installing an under-cabinet plug molding so you can do it quickly.
Prior to Installation
Carefully remove all of the under cabinet outlet mold's parts, including screws and batteries, from the box. Make sure you don't leave anything inside the box it arrived in behind because it might come in handy down the road.
Find out where the under-cabinet plug mold needs to be installed. On a side next to a basin, a kitchen counter, or another location? Just be sure to pick a location away from any damp places where there is a chance of regular water splashing. Avoid placing appliances between cupboards that are too far apart, bathroom flooring, bath tubs, and other similar items.
Create marks on the required location to indicate where to make a hole to secure the under-cabinet mold. Additionally, ensure there is sufficient distance between them so that during installation, you don't drill into any of them.
Besides, determine if you want to hide your electrical outlets if you are a perfectionist and don't have matching plastic switch plates and outlets with particular tiles and hues. Then, If you've run out of inventive ways to conceal power outlets in your kitchen renovation, consult with local kitchen remodeling experts for guidance on how to keep your design intact.
Create Holes
Drill holes in accordance with measurements to ensure a flawless fit. And once properly fixed on to every surface using the screws included in the kit, it won't come loose.
If additional plastic anchors are required for a solid hold against plasterboard or wood surfaces, install them. As long as these don't need to be installed with a drill and are less than the size of the screw holes. Keep in mind that the cheap ones ought to be harder than plasterboard and softer than metal.
After drilling the holes, screw the under cabinet molding firmly into place from behind, making sure that all of the fasteners are secure and that you can handle it without damaging or ripping them.

Organize The Wires
If there are battery slots included with the kit, place the batteries in them. Use non-rechargeable ones instead as they might not have enough power.
Every wire that must be connected should have a wire connector attached. Before using locking pliers if necessary for a tighter fit, make sure the temperature shrink end of each cable touches other strands that are connected together. But do not fracture or break them. When installing an under-cabinet plug mold, the pieces could become lodged in the socket. Additionally, it would result in electrical problems, thus caution is required.
In order to prevent sparks that could start a fire when placing electrical items with cords attached, push wire down into the walls or beneath the cabinet as well as screw in wire mold caps to seal off of each wire separately. This can be done to keep the wires firmly in place.
You can connect something into your new under-cabinet mold once you've verified that all of the plugs, sockets, and cables are linked correctly. It may now function even more effectively. An environment that is safer in the kitchen can be achieved by hiding them under cabinets.
Benefits of installing under cabinet outlets
- Enables home equipment that must be plugged in when not in use to do so in a more secure and organized location (toaster, blender etc.)
- ensures that plugs and cords are not harmed by heat, liquids, or collision with furniture.
- Consider using the area above your kitchen counter for things like cooking tools, meal preparation, storage, etc.
- keeps your cord arrangement neat and orderly and out of the way of people walking underneath cupboards. When hidden behind equipment or inside outlets beneath the countertop, wires constantly create mess.
- Occasionally makes appliances reachable when you're standing directly in front of them, eliminating the need to move, climb over other kitchen accessories, or reach behind equipment to access storage areas.
- prevents youngsters from receiving an electric shock should they come into contact with wires by accident. Regular toddlers and older children are unable to reach them because they are located under cabinets.
- When all of the wires are hidden beneath cabinets and appliances, your kitchen looks better. Your kitchen will look neat, tidy, and clutter-free as a result.
- If you periodically need to remove something for repair, you don't need to relocate full appliances away from the way.
Conclusion
An outlet strip inserted under cabinet doors powers the appliances. This is known as an under cabinet plug mold. Outlets are typically located inside kitchen cupboards, but they are typically exceedingly inconvenient for any usage.
Below cabinet outlet stripes offer electrical access points for plugging in appliances wherever there is space for them, which is one of their advantages. So that you can benefit from high-quality features without being concerned about exposed wires that are hanging around everywhere.
However, under cabinet outlets are harder to see and reach than regular wall plugs, making them a less desirable option for arthritis sufferers or poor vision. Cords won't be hidden if you want to leave a piece of equipment like a coffee machine hooked in all the time; instead, they will hang from the ceiling.


