If you have purchased a new flush valve, whether for newly installing or replacing your old one, you may want to take a glance at this article. In the upcoming sections, we are going to show you detailed instructions on how to install a flush valve for your toilet. It is easier than you have expected, and you are capable of doing it at home.
So, should you have not figured out how to put on a flush valve, keep reading to the next line. Besides, we would first go through the concepts of flush valves and types of flush valves differentiation, in case you have not acknowledged them.
1. What Is A Flush Valve? What Are The Types You Can Expect?
What is a flush valve?

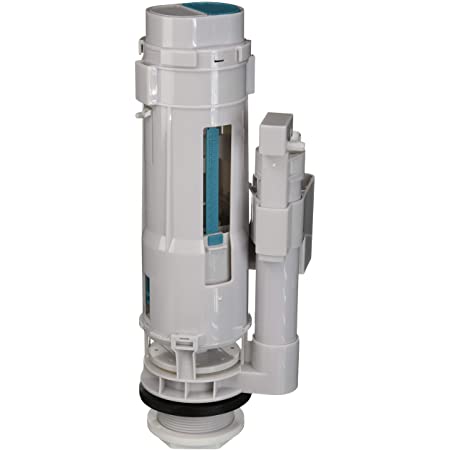
A flush valve is a device with a self-closing feature, allowing it to release certain amounts of water to flush down a toilet. It is located within the toilet tank and associated with the mechanism of the tank to function.
A flush valve is often activated through a button outside the tank. This item, in general, has functions, including leak-stopping and flushing toilets. It is divided into several groups and provided by numerous home-device brands.
You can easily find a flush valve online with a suitable budget. The budget ranges vary from less than 10 bucks to more than 30 bucks. It is not an expensive item to purchase, in our perspective, since the flush valve is in the home tools section, which can barely go beyond your spending. Flush valve is a familiar device for everyone since we use it daily.
What are the types of flush valves available on the marketplace?

After surveying, gathering, and summarizing all the information, we have come up with 5 types of flush valves for you. The kinds are the standard flush valve (or you can call it a 2-inch one), the 3-inch flush valve, the 4-inch flush valve, canister style flush valve (or towel), and the dual flush valve. Now we would come to the explanation part, telling you what are the differences among the 5 kinds of flush valves.
The most common type of flush valve used in households or hotels is the standard one. They are easy to use and install. They also have impressive compatibility with various types of toilets (in most cases it is all toilets).
When you purchase the standard flush valve, you are likely to get a price tag of 10 or 20 bucks, depending on the brand providing you. We would say that the quality goes with the cost. However, there are still high-quality but low-price products you can purchase online or offline. The drawback of this standard flush valve is that it is the slowest to flush, and it can be less economical than the others. But its price is also the lowest, compared to other models.
As we compare the standard, 3-inch, and 4-inch flush valves, we see no remarkable difference in the working mechanism. The distinguishing point here is probably the speed and capacity of each one. The 3-inch and 4-inch (the 4-inch flush valve is the largest one) allow faster flushing while using less water. So if your toilet is compatible with a 3 or 4-inch flush valve, we don't see why you would not purchase a 3-inch or 4-inch flush valve.
The towel style or you may call it a canister style flush valve, is slightly different from the 3-inch one. It has almost the same construction and mechanism, but the towel-style item would allow unlimited water when opening.
Last but not least, let's talk about the dual flush valve. What makes it outstanding from other types is its ability to save water. When using a dual flush valve, you have two flushing options. A dual flush valve is activated with a double button. One is for a half flushing and the other is for the full one. That's why the dual flush valve is more economical to use than the other flush valve kinds.
2. How Can You Install Or Replace A Flush Valve?
As we have explained to you what a flush valve is, and what types you can expect when purchasing a flush valve, in this section, we will talk about how to install or replace your flush valve at home. Here is the process. Try to follow it closely.
- First of all, turn off the water supply in your toilet tank. When doing this, you must flush all the water in the tank first, then disconnect the water supply through the water supply line beneath the tank. After disconnecting the water supply line and the tank, take a sponge to clean all the water left in the tank. If you have finished all the minor steps, you have been successful at this point. It is easier than you think.
- After you have cut off the water supply for installation, unbolt the toilet tank from the bowl and lift up, and place it on the ground for the next task. Remove all the washers, nuts, old bolts, and a gasket. Clean it with the sponge once again to completely remove all the water left, if you have been unsure. Also, remove the old flush valve, along with its flapper or tank ball unit, in case you are replacing the old one. If you are installing a new flush valve to your toilet, keep going on.

3. All have been removed, take a new flush valve and install it on your toilet. Keep in mind that the top of the overflow pipe is at least 1 inch below the hole in your toilet tank, where the flushing level is located. If the length goes beyond this, you can adjust it with a saw for a more suitable length.
4. Now to the reconnecting part. Firstly, tighten your lock nut, then the new gasket onto the threaded end of the flush valve. Remember that you must not overtighten all the details so that your flush valve or any other part would break. Next, place your tank back on.
5. In the fifth step, we will reconnect the tank through bolts. Also, we connect the flapper chain and attach the refilling tube to the overflow pipe. We have almost finished if you have reached this step.
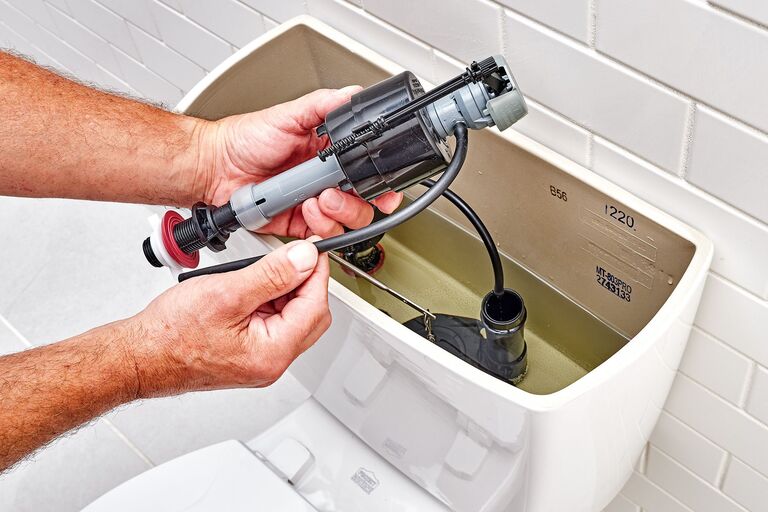
6. Finally, we must reconnect the water supply line at the bottom of the toilet. At this step, check for leaking carefully before you use the toilet. Many people have been complaining about the leaking problem. It mainly comes from our improper water supply line connection in the first place, or the line getting loose throughout the usage time.
Conclusion
Our article has reached the ending lines in this section. There are totally six steps in our process of flush valve installation. We have tried to minimize and simplify the process as much as possible for readers because we know that not everyone has knowledge about device installation. The case is common. We hope the instruction we have given is clear enough, and we wish you the best of luck.


